

Did you know that structural failure is the cause of some of the most tragic accidents in history? While the structural integrity of your home won't have the same impact as, let's say, the Tower of Pisa, it is still important that your home is a stronghold that won't fail.
Installing joist hangers is a crucial step in ensuring the structural integrity and longevity of various construction projects. However, structural support can also enhance the look of your home no matter your design style.
In this step-by-step guide, we will cover the essential aspects of installing joist hangers. Ready to learn more? Continue reading!
Joist Hangers 101: An Overview
Joist hangers play a crucial role in providing structural support and stability to various construction projects. Whether it's:
- Building a deck
- Framing a floor
- Constructing a roof
Joist hangers are essential components that ensure the strength and longevity of the structure.
Iron joist hangers effectively transfer the load and distribute it evenly, preventing:
- Sagging
- Warping
- Failure
This vital connection not only enhances the structural integrity of the entire framework but also minimizes the risk of accidents or collapses.
Proper installation of joist hangers is crucial, as it ensures that the load-bearing members are securely and accurately connected, optimizing the overall strength and stability of the structure.
What Tools Will You Need?
Before embarking on the installation of joist hangers, it's essential to gather all the required tools and materials to ensure a smooth and efficient process.
Having the right equipment at hand saves time, minimizes frustration, and allows for precise execution of the task at hand.
Here is a list of the necessary tools:
- A measuring tape for accurate measurements
- A pencil for marking the placement of joist hangers
- A level to ensure proper alignment
- A hammer or drill for attaching the hangers
- A saw for cutting any necessary materials
-
Safety equipment
- Gloves
- Safety glasses
It's important to have these tools readily available before starting the installation, enabling you to work confidently and effectively.
In addition to the tools, gathering the appropriate materials is equally important. The list of required materials includes joist hangers, which come in various sizes and types depending on the project's specific needs.
It's crucial to select hangers that are suitable for the size and load requirements of the joists used. Other materials needed may include:
- Galvanized nails or screws for securing the hangers
- A ledger board if applicable
- And any necessary lumber for framing or supporting structures
It's recommended to consult local building codes and regulations to ensure compliance and determine if any additional materials are required.
You can streamline the installation process and ensure that you have everything you need to complete the task efficiently and effectively, by gathering all the necessary tools and materials beforehand
How to Get Your Workplace Ready?
Before diving into the installation of joist hangers, it's crucial to prepare the work area to create a safe and efficient environment. This step ensures that the installation process goes smoothly and reduces the risk of accidents or complications.
Clearing the area of debris and obstructions is essential. Remove any loose materials, tools, or debris that may hinder your movement or interfere with the installation process. By clearing the workspace, you minimize the chances of tripping or damaging the materials.
Be mindful of any overhead obstructions, such as low-hanging branches or utility lines, and take appropriate measures to address them before starting the installation. This proactive approach ensures a clutter-free and hazard-free work area, enabling you to focus on the task at hand.
Equally important is ensuring a stable working surface. A secure and level foundation is essential for the accurate installation of joist hangers.
Start by examining the surface on which you'll be working, such as:
- Deck
- Floor
- Subfloor
Check for any signs of instability or unevenness that could affect the alignment and support of the joists. If necessary, make the required adjustments to level the surface or reinforce it, ensuring that it can adequately support the weight and load of the structure.
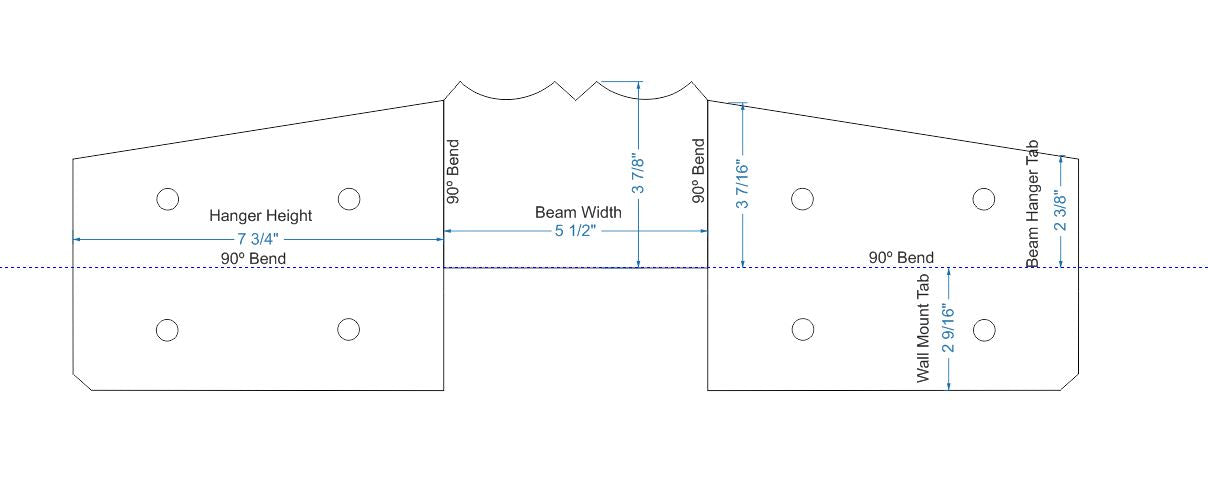
Finding the Right Place and Size for Your Iron Joist Hangers
Properly placing and sizing joist hangers is vital for ensuring structural integrity and optimal support. This step involves a careful assessment of the:
- Load-bearing points
- Accurate measurements
- Selecting the right hanger size and type
Load Bearing Points
These points are typically where the joists will be connected to beams, headers, or ledger boards. It's essential to identify these key support areas to determine where the joist hangers will be installed.
Carefully examine the structural plans or consult with an engineer or building professional to ensure accurate identification of these load-bearing points.
Accurate Measurements
This measurement will help determine the spacing and placement of the joist hangers. Using a measuring tape, measure the distance between the centers of adjacent joists.
Consistency in spacing is crucial to maintain structural integrity and prevent sagging or uneven weight distribution. Be meticulous in your measurements to ensure accuracy and precision.
The Right Hanger Size
Consider the:
- Load requirements
- The size and dimensions of the joists
- Any specific building codes or regulations that dictate the hanger specifications
Joist hangers come in various sizes and types, each designed to accommodate different loads and joist dimensions.
Refer to manufacturer guidelines or consult with a building professional to ensure you choose the correct hangers that provide the necessary support for your specific project.
Marking the Spot for the Joist Hangers
This step involves using a measuring tape and pencil to mark the positions where the hangers will be attached.
To begin, use a measuring tape to measure and mark the desired distance from the load-bearing points or ledger board. Take accurate measurements, ensuring that they align with the predetermined spacing between joists. Measure from the center of one joist to the center of the adjacent joist, and repeat this process for each joist that requires a hanger.
Using a pencil, mark the measured points on the appropriate locations of the:
- Beam
- Header
- Ledger board
Make clear and visible marks that will be easily identifiable during the installation process. It's recommended to use a light-colored pencil or a contrasting color to ensure good visibility.
To ensure accurate and consistent measurements, maintain a systematic approach. Double-check each measurement to avoid any errors.
It can be helpful to have a second person assist in holding the measuring tape and verifying the measurements.
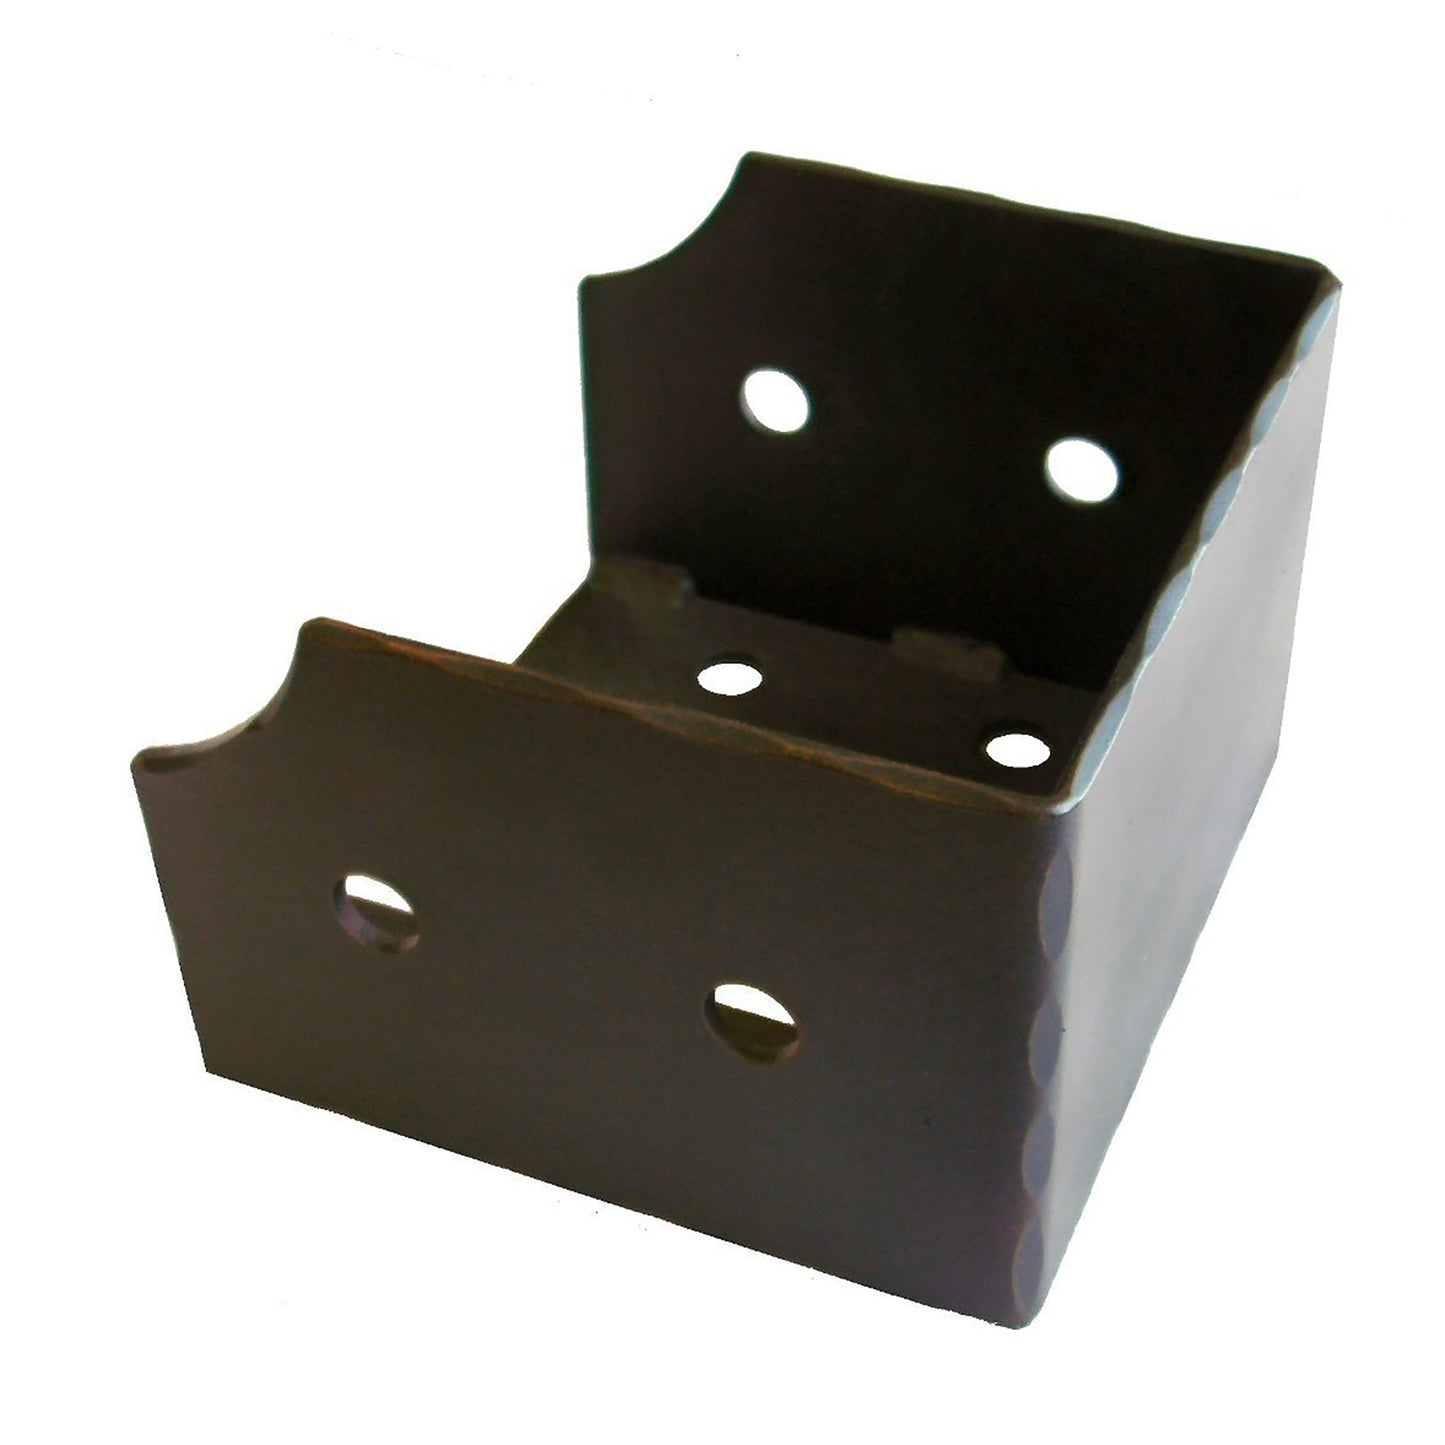
Attaching the Iron Joist Hangers
Once the joist hangers are accurately marked, it's time to secure them in place. This step involves positioning the hangers, aligning the holes, and ensuring proper fastening for stability.
Positioning
To begin, position the joist hanger on the marked location. Align the hanger with the marks on the beam, header, or ledger board. Ensure that the hanger is level and properly oriented to accommodate the joist.
Pay attention to the orientation of the hanger, as some types may require specific positioning for optimal support.
Aligning
Next, align the holes of the hanger with the joist and the ledger board. The holes should match up perfectly, allowing for secure attachment.
Take your time to ensure that the holes are aligned accurately, as any misalignment can compromise the stability of the connection. Adjust the position of the hanger if necessary to achieve proper alignment.
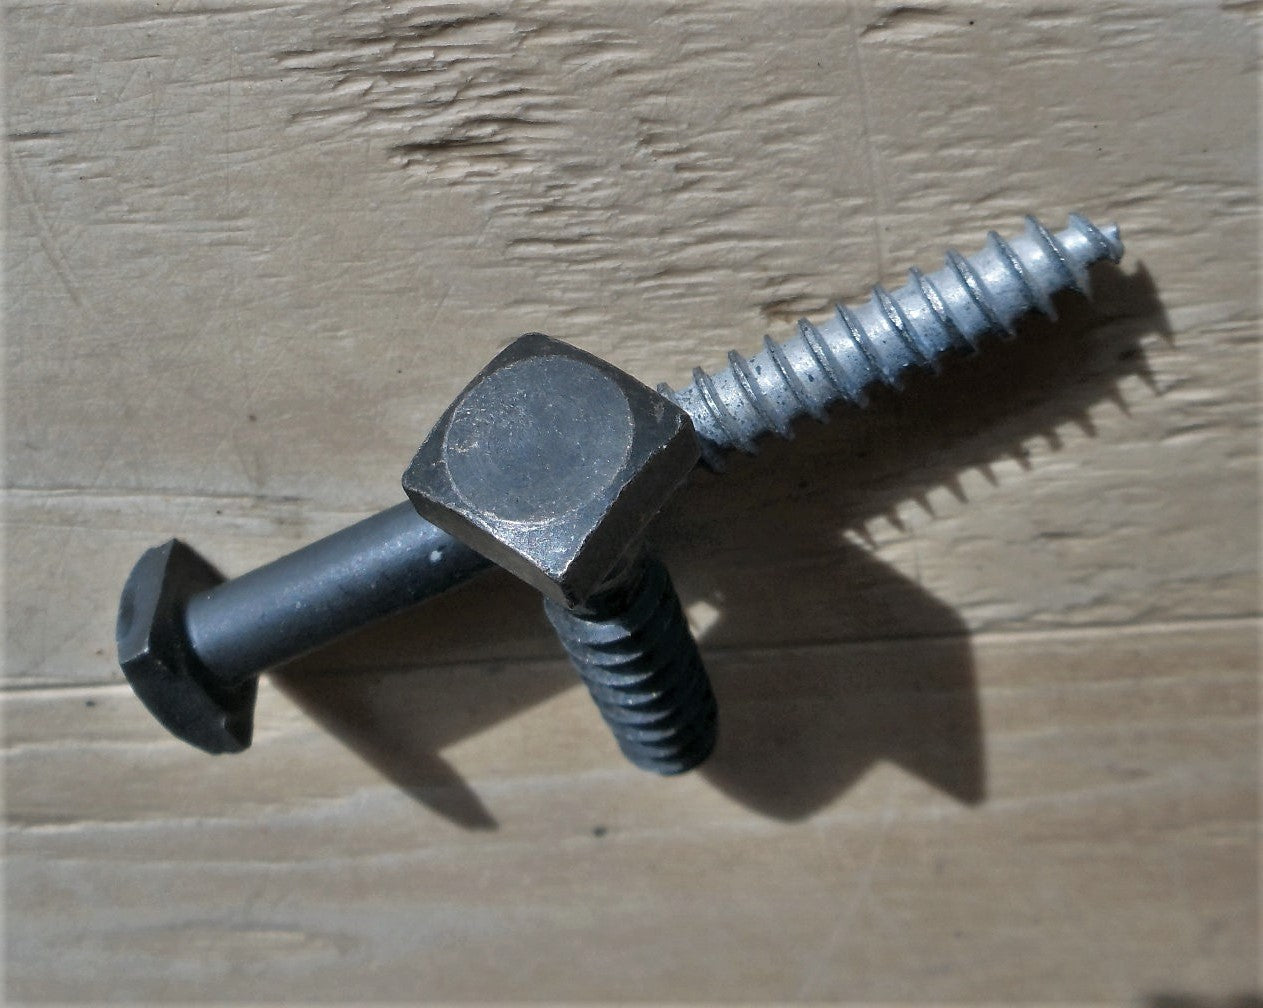
Securing
Once the hanger is positioned and the holes are aligned, it's time to secure it in place. Use galvanized nails or screws specifically designed for joist hangers.
These corrosion-resistant fasteners provide long-lasting support. Carefully drive the nails or insert the screws through the holes, making sure they penetrate the joist and the ledger board securely.
Follow the manufacturer's guidelines regarding the recommended size and quantity of fasteners.
Fastening
Ensuring proper fastening is crucial for stability. Verify that the hanger is securely and tightly attached to the joist and the supporting structure.
Use a hammer or drill to drive the nails or screws fully, ensuring a snug fit. The hanger should be firmly fixed in place, with no wobbling or movement.
Double-check the fasteners to make sure they are flush with the hanger, avoiding any protruding or loose nails or screws. This will ensure both a clean, finished look and the structural integrity of your home.
How to Inspect the Angled Joist Hangers?
Check for secure attachment and alignment of the joist hangers. Examine each hanger to ensure that it is firmly attached to the joist and the supporting structure.
Wiggle the hanger slightly to test for any looseness or movement. If any hangers appear loose, reinforce them by driving additional nails or screws as needed.
Verify that the hangers are aligned properly with the marked positions on the beam, header, or ledger board. Misaligned hangers can compromise the load distribution and structural integrity, so it's important to make any necessary adjustments if alignment issues are detected.
Use a level to check if the hangers are installed in a level position. A slight deviation from levelness can impact the overall stability of the joists and the structure they support.
If any hangers are not level, adjust them accordingly by loosening the fasteners and repositioning the hanger until it is level. Also, visually inspect the hangers to ensure they are not:
- Bent
- Damaged
- Showing signs of stress
You should replace damaged or compromised hangers promptly to maintain the structural integrity of the construction project.

Are You Looking for Decorative Joist Hangers?
Proper installation of joist hangers is a critical aspect of creating a structurally sound and stable construction project. This step-by-step guide provided you with the knowledge and guidance necessary to install joist hangers effectively and efficiently.
Are you looking for decorative joist hangers that will elevate your home? Take a look at our collection!